If you’re experiencing stutters, frame drops, or general performance issues while gaming on Windows, your antivirus might be part of the problem – specifically, Windows Defender’s real-time scanning. While it’s great for keeping your system secure, it can sometimes get a little overzealous, scanning game files or mod folders right when you’re trying to squeeze out every last frame.
The good news? There are safe and simple ways to reduce the impact. By excluding files from Defender’s scans and enabling Windows Game Mode, you can free up system resources and improve performance without compromising security. In this post, we’ll walk through exactly how to do it.
To pinpoint whether Windows Defender is slowing things down during gameplay, we’ll be using the Microsoft Defender Antivirus Performance Analyzer – a built-in diagnostic tool that runs through PowerShell.
- Run PowerShell as admin
- Change to the desktop folder by running the cd command (cd means change directory)
cd ~/Desktop - Prepare the scenario when the stutters occur.
- Start the recording by running the following in PowerShell:
New-MpPerformanceRecording -RecordTo msfs24-stutters.etl - Once the stutters have occurred, stop the report. Stop the report by pressing the enter key in PowerShell. The report file will be saved to the etl file. It’s better to stop the recording early so you don’t get any false positives. It’s normal to have files scanned, but you only want to detect the stutters. In my example, I simply opened Volanta and Navigraph Charts.
- Start by getting an overview of the report by running:
Get-MpPerformanceReport test.etl -Overview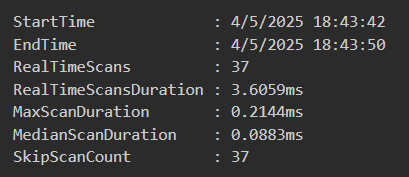
- In my example eight second scan, the maximum scan duration by windows defender was only .21ms. This is very quick, and not a problem that would impact gameplay. You would probably notice stutters that are around 200ms (about a quarter of a second).
- To list the top files that were scanned, run the following command in the same PowerShell window:
Get-MpPerformanceReport test.etl -TopScans 20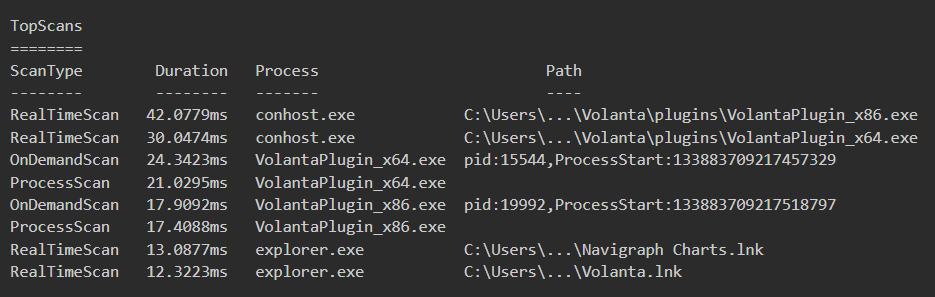
If you see any file(s) / paths that have a lot of scans, and the duration is high (over 200ms), then add an exclusion for that path. Note: You can also runGet-MpPerformanceReport test.etl -TopProcesses 10for a list of processes that windows defender is scanning, and add exclusions for them as well. - Exclude the Offending Files and Processes
- Go to the start menu and search and navigate to “Virus and Threat Protection”, then “Virus and threat protection settings”. Click “Manage settings”.
- Scroll down to “Exclusion” and click “Add or remove exclusions”. Click “Add an exclusion”, and add the offending folder, file, or process.
- Some of the exclusions I have added:
- Process: FlightSimulator2024.exe
- Process: X-Plane.exe
- Process: FlightSimulator.exe
- Process: Volanta.exe
- Folder: C:\Program Files\FenixSim A320\Fenix.exe
- Repeat the scan, and keep adding exclusions as needed.
Important Note for Excluding Paths:
Be careful not to add too many exclusions, and keep them as specific as possible. Exclusions can create attack vectors for malicious software.
- Keep exclusions as specific as possible – target individual
.exefiles or DLLs. - Never exclude system folders or drives.
- Avoid blanket exclusions for mod folders unless you’re sure the content is from a trusted source.
- Stick to trusted games and developers. If you downloaded the game from a sketchy site, it’s probably better to let Defender do its job.
Also, over time, you might stop playing certain games or move files around. Make it a habit to review your Defender exclusions periodically and remove any that are no longer relevant.
Leave a Reply